Category Archives: Uncategorized

Let’s swap the intake…and then some.

Most of this work was done in the summer/fall of 2016. I started this post a long time ago and am just now getting around to posting it. – JE

———————–

In the spring of 2016 I got a good deal on a GM ZZ4 performance intake manifold and matching chip that would fit nicely with the GM 305HO engine in my Avanti, so I figured I would swap them out. One thing led to another and in addition to the intake manifold I ended up replacing:

  • Water pump
  • Convert from fan clutch back to electric
  • New fan shroud
  • New radiator, upper and lower hoses
  • New alternator
  • New carburetor
  • New brake booster
  • New fuel pump
  • Cap, rotor, impulse coil
  • Oil Sender
  • Refinish air cleaner, replace with K&N filter
  • New Coolant overflow tank
  • Transmission cooler
  • Thermal wrap exhaust pipes
  • Thermostat and housing

Like many projects, it started out simple enough. Starting from the top, with the intake removed there was easy access to the water pump – the original cast-iron unit was rusty so I figured it was a good time to replace it with an aluminum unit. Thermostat and housing were inexpensive and easily replaced. A new coolant overflow tank and hanger from Studebaker International and upper and lower hoses finished it off.

With the water pump removed, there was easy access to the radiator, so I removed it and sent it to a radiator repair shop. They quoted what I thought was an obscene $400+ to refurbish it, so a quick trawl through the AOAI forums and I discovered what others had done instead. I ordered a nice aluminum radiator from Speedway Motors. The new, thicker, radiator meant the old clutch-style fan that the original owner had installed to replace the original “not up to the task” electric fan in 1986 no longer fit. The new radiator no longer had a transmission cooler, either.

Then it was back to Speedway for a transmission cooler, and then to Summit Racing for a modern fan controller. Finally, I got a new fan shroud and cooling fan from Zirgo.com to tie it all together.

In the course of replacing the water pump  I was right next to the alternator, which originally output 94 amps. I’d previously had good luck with the Powermaster brand so I went with a 140amp unit from them.

With all that out of the way, I figured I might as well replace the fuel pump, as i was confident it was original, as well.

The brakes had always been funny in the Avanti. When I first got it, the passenger side rear would lock up in anything remotely resembling a panic stop situation. I replaced the wheel cylinders, even though ones on the car looked like they had recently been replaced. Perhaps the previous owner had the same thought? Made no difference, though while I was in there I replaced the nasty looking brake master cylinder and flushed the fluid.

Shortly after this I was looking around underneath it again and I discovered that the metal brake line on the driver’s side rear axle was crushed. I presume someone put a tow hook around the axle at some point and crushed the brake line. Once that was replaced braking was better but still not great.

Spoke with Jon Myers at the AOAI/SDC meet and he suggested a rebuilt brake booster. A local club member had mentioned something similar so I sent it off to Jon in Ohio. A few weeks later it was returned and re-installed. Now I think it’s probably as good as it’s going to get with the original front discs and rear drums.

The original oil pressure sender was toast, and the current replacements required a 90 degree elbow fitting to clear the air cleaner/ignition distributor.

On the subject of the ignition distributor I also replaced the impulse oil, cap and rotor. Interestingly, the three wire connector on the ignition control module (ICM) can be fitted right side up or right side down. Some time chasing this one revealed I had reinstalled it incorrectly, which manifested itself in a strange running condition. The Chevrolet shop manual for the 84 Camaro came in extremely handy when diagnosing this issue.

Over the last year or so of running the car with all this work done, it would periodically quit and refuse to restart until the ICM was replaced. I had used a judicious amount of dielectric goop to insulate it, but it was still eating ICM’s like candy bars. I mentioned this to a co-worker and he encourage me to closely look at the grounds on the distributor. Sure enough, I had powder coated the hold down. With the powder coat removed, so far this seems to have cured the problem.


Got a light?

Sometimes it’s the little things in life…like the cigarette lighter, in this instance.

I don’t smoke, and while there’s little evidence the previous owner of my ’85 Avanti did, the lighter never worked right, the lid never closed properly and the ash receptacle was rusty and nasty.

The ash receptacle was easy enough – a call to Studebaker International and a replacement part was sent out right away and fit and look great. So great, it made the pitted surrounding area look like crap. Rather than buy another – I’m not even sure if they are available – I disassembled it by removing the lighter assembly and the ash receptacle. Then I sprayed it several coats of black plasti-dip, masking off what I didn’t want to have to clean off later.

The lighter assembly was trashed – lots of corrosion and crud. A test light showed that it had intermittent connectivity and cleaning it with a wire brush just made things worse as more and more of the metal disintegrated. Since I didn’t really want the lighter part anyway, just a working receptacle that I could stick a USB adapter into for my phone, etc.,  it didn’t really matter much to me what I ended up with so long as it fit and functioned.

A trip down to the road to my local O’Reilly Auto Parts and I quickly found exactly what I was looking for – Custom Accessories #10213 – virtually identical to the original part which made it install, connect and appear just like the one I removed, only this one functions great. I did replace the included incandescent bulb with a red LED which was easily done.

avanti lighter2


Adding a center console armrest

I love me a good center console armrest. The Avanti didn’t come with one, but an enterprising owner who must feel the same way that I do came up with a solution.

Boy, the car sure was dirty when I took those photos! Anyway, this is some sort of imported car console that the seller modifies slightly and fabs up a special bracket. I got mine from him in the velour material as he acquired it and then had my local trim shop re-upholster it in a blue that looked close. The flash in these photos really makes the blue look brighter than in it is real life.

Flips up and out of the way as shown in the third image when necessary but also rests nicely on the raised brake handle when parked, too. Little coin holder inside, and a small access hole at the back for snaking your phone charger/AUX cable through.

To get yours, email Charlie at “northeastavanti(at)aol.com” and he can set you up with one. Installation – no drilling required – was straightforward and all hardware is included along with photos and instructions.I highly recommend it.

Sorting the brakes…

The brakes had always been funny in the Avanti. When I first got it, the passenger side rear would lock up in anything remotely resembling a panic stop situation. A cursory inspection on a lift didn’t reveal anything, so I finally took it to what had previously been a shop I respected. They suggested wheel cylinders but were otherwise stumped.

I replaced the wheel cylinders, even though the ones of the car looked like they had recently been replaced. Perhaps the previous owner had the same thought? Made no difference, though while I was in there I replaced the brake master cylinder and flushed the fluid. Shortly after this I was looking around underneath it again and I discovered that the metal brake line on the driver’s side rear axle was crushed. I presume someone put a tow hook around the axle at some point and crushed the brake line. Once that was replaced braking was better but still not great.

Spoke with Jon Myers at the AOAI/SDC meet and he suggested a rebuilt brake booster. A local club member had mentioned something similar so I sent it off to Jon in Ohio. A few weeks later it was returned and re-installed. Now I think it’s probably as good as it’s going to get with the original front discs and rear drums.

I’ve talked with Turner Brakes about a conversion kit for the rears but he’s advised that his kit is not compatible with the ’85 models, so for now I will live with them as they are.


Blaupunkt Sacramento

blaupunkt

The original stereo in my ’85 Avanti was a Blaupunkt Sacramento that was apparently discarded and swapped for an AM/FM/Cassette Pioneer head unit and new rear speakers in November 1998 by the original owner. Having a soft spot for keeping the visible things “period correct” but wanting something a little more modern, I did some research into my options.

I discovered a guy in California (sadly now passed away and shop closed) who had an “old school” stereo repair place and he offered a service to completely go through a stereo and integrate an unobtrusive and otherwise invisible AUX input, which would allow me to use my iPhone via the headphone jack. He advised that he had no schematics or parts list for the Sacramento, and said that would speed the job up and make it less expensive.

First order of business was to find another Sacramento head unit. Easiest place to do this was to just search on eBay – and though they weren’t very common, one would pop up every month or so. Eventually I found one that looked to be in good physical condition, all connectors still attached, complete with knobs/faceplate and reported as “working when removed”.

Next up was a set of schematics – a bit easier to find after a trip to http://www.stereomanuals.com – $24 and a week or so later, I had a VERY nice quality reproduction of the original service/schematic/parts manual for the Sacramento. I made a copy for my stereo repair/service guy and sent it and the stereo off for him to work his magic. I’m still scanning this manual so that it’s as clean as can be. In the meantime, I’ve had a request for a PDF of the original operating instructions for the Sacramento – you can download it here (14mb).

My stereo guy ended up doing a major overhaul  on this “working when removed” head unit to include:

  • Tape drive motor and motor servo
  • All rubber parts replace
  • Donor display from a Blaupunkt CR-3001 as mine had a bad segment
  • Tape audio had a bad head cable and an intermittent AR switch
  • General clean, lube and adjust

Adding the AUX input is done by interrupting the first audio stage of the radio with impedance matching and switching circuit.

I am still looking for a have finally located a pair of the original Blaupunkt 6×9 speaker grilles like shown here:

blaupunkt speaker grille

Mine were removed and most likely discarded when the Pioneer speakers were fitted back in 1998 with the head unit. Please contact me if you have one or even two!

LEDs all around!

In my day job, we strongly encourage the use of LEDs in place of incandescents wherever possible. Naturally, I wanted to do the same with my Avanti.

In my ’85, I needed the following:

Front turn signals

Front side markers

Rear brake light

Rear turn signals

Reverse lights

Rear turn signals

Flasher Unit – Two required, one for turn signals and one for the flasher. I used the Signal Stat 262 Electronic Flasher. Make you get the electronic version as the non-electronic version is not suitable for LEDs. I have a few extra if you can’t find one locally or online.

About the same time I was doing this, the Summer/Fall 2014 issue of the AOAI magazine came in the mail, and Bill Henderson had written an article about replacing the instrument cluster lights with LEDs, so I took his advice and did that, as well. Much better lighting, brighter and the red glow is a nice touch.

My first reproduction part for the Avanti!

I never knew that the two star-shaped knobs on the outside of the Recaro seats were supposed to have little plastic discs covering the nut holding the knob in place – until I found one in my ashtray.

knobs

The disc is marked on the inside with PEKALIT which now translates into “unobtainium” based on my research. I did run across some nice guys over at Benzworld.com who have a need for these discs also on the Recaro seats that were used in the 500-series cars from the mid-80s.

I first tried my “go to” guy for short run molded plastic parts, but these parts were so thin that he had a great deal of inconsistency in getting these made with a urethane mold. I tabled the idea for a year or so until I located a new supplier who could make a fairly low cost CAD drawing, aluminum mold and also cast the parts for me, as well.

 cad

mold

The finished parts came in today, and I couldn’t be happier with them. The worldwide, lifetime market for these is in the low hundreds, at best, but I am happy to have these parts and to also have them available for anyone else who has the need.

I made a little video on them here. They are available for purchase on Ebay at $4 each, which includes free shipping anywhere in the USA.

Window motors/regulators

Since I bought 4245 in late summer of 2012, it was plain that there was something wrong with the power windows. The drivers side would only go down haltingly and only go up with a lot of help by pulling on the glass itself. The passenger side was marginally better.

About the time I decided I would have to do something with it, issue #161 of the Avanti Owners Association magazine arrived at my door, with an excellent article on how to remove the windows, window regulator and get (almost) everything back in good order again. I say “almost” everything as a critical part of my problem (and easy to fix while you’re in there) was not covered in this article, which is what I’ll focus on here.

After removing the window regulator mechanism and window per the parts manual and following along with the aforementioned article, I noticed that window motors themselves seemed to be rather “gunked up” with old grease. I then removed the motors from the mechanisms (watch that winder spring!) and removed the cover that goes over the gears on the motor itself.

The gears appeared to  be in fairly good shape, but there were literally hundreds of small shards of plastic mixed in with the grease.  A bit of judicious searching on the web identified these shredded pieces as having been “impact absorbers” (for lack of a better term) nested inside the gear housing that, as I understand it,  act to soften the impact as the gears moved back and forth while going up and down.

gears3 gears1 gears2

Through more web searching, I was able to identify a replacement for just the gears and these little absorbers. This part crossed over to a number of different cars from the late 1960s to the late 1980s. I was able to obtain it from RockAuto under Cardone Part #8294 for $12.47.

gears4 gears5

Since I already had the window motors apart, replacement was easy – cleaning out the old grease and making sure I got each little bit of the former gears out was time-consuming, but not difficult. Occasionally I used some toothpicks to get into tight places.

Re-assembly was straightforward, and now the windows with this fix along with the rest of the maintenance performed as described in the AOAI article including cleaning and lubricating the tracks, regulators and replacing the outer wipe seal have made a phenomenal difference in how the windows perform. Up and down quickly, quietly and smoothly!

Build Sheets for 4245 (and 4238)

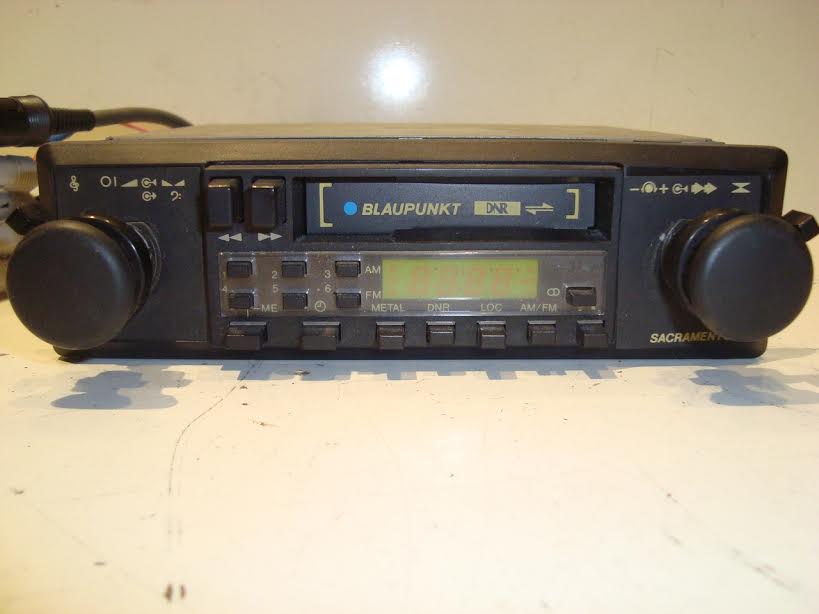
As I mentioned last year, when I first got the car the stereo bezel was in the glovebox (the original Blaupunkt Sacramento had been replaced with a Pioneer unit) and I found the number 4238 handwritten on what would be the “inside” or non-visible when installed side. I presumed that this was another RQB or last four of a different VIN.

DSCF1667

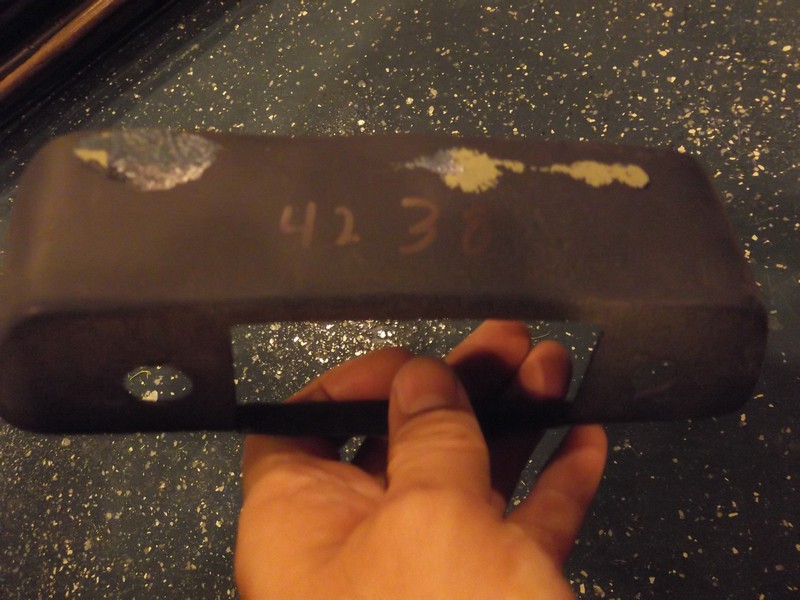
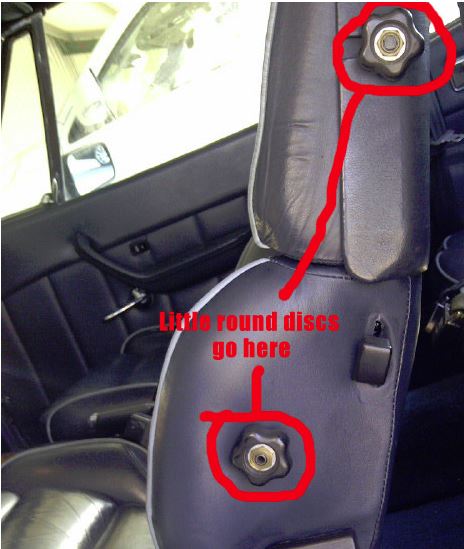
In the past several months, as I have removed more interior panels as part of repairing the window motors/regulators and fitting Dynamat to the car, I have found more instances of the “4238” number on the back sides of the door panels and “4237” on the back sides of the rear seat bottom and rear seat back.

DSCF1661

DSCF1662

DSCF1666 DSCF1664

Earlier this year I bought the build sheets from Dan and Betty Booth at Nostalgic Motors in Wixom, Michigan. Along with what is the largest stock of NOS Avanti parts, they also have original build sheets of almost all the Avanti production up to 1985 (and factory inspection sheets for Studebaker Avantis, as well). They will kindly make a copy of build sheets for you for anywhere from $25 (for Studebaker Avantis) or $35 (for 1966-1985 Avantis). Is it steep for a piece of paper? Yes. John Hull, a former Avanti exec from the 80s/90s also has a less complete (I’m told) set of these, and I think his rate may be more reasonable. I went with the Nostalgic as John Hull did not have build sheets for either of these two cars, 4238 or 4245.

All that said, here are scans of the copies I received – I received a total of five copies as there were multiple, different sheets with my production number.

This is the Build Sheet for the VIN for which I found written on the backs of several parts of 4245.

This is one of the four copies I received for my car, 4245. Note that nothing appears to be selected, and the exterior color is a “Light Chestnut Metallic” and the interior “Creme”. Followers of this blog know that my car is light blue metallic with midnight blue interior.

Note

Virtually identical, save for the circled “line number” of 4245 and the misspelled word “CANCELL” written across the top.

Hmmm

Hmmm – yet another for 4245. This one says “Void 9/11/85”  – odd since my car shows a build date in the door jamb VIN plate of May 1985.

DSCF1668

Also, what appears to be the initials “R-something” – of “where are you know, Mr/Mrs/Ms R-something” – I’d sure like to ask you some questions!

Another?

Another? Yes, I’m afraid so. This one has a few things underlined, and then, of course, the giant “X” through the middle of the sheet.

hmm

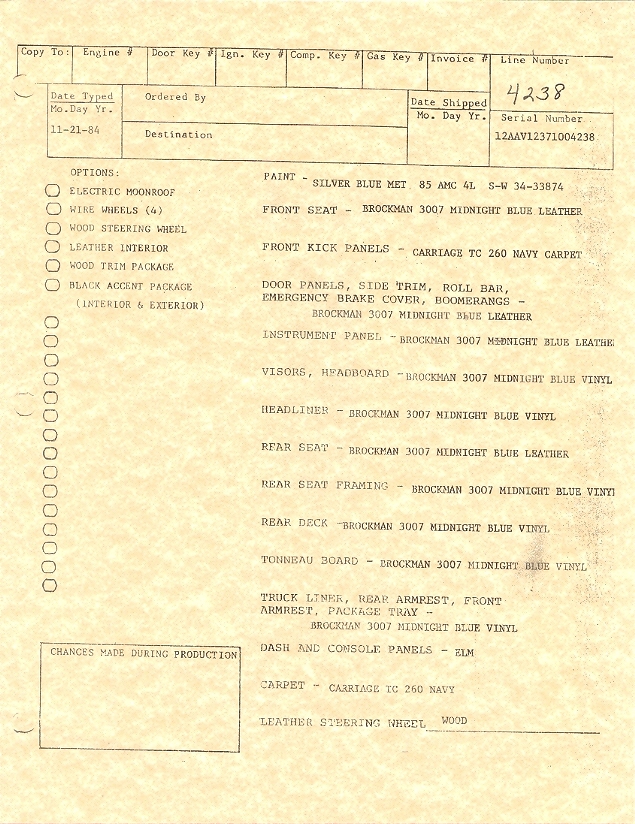
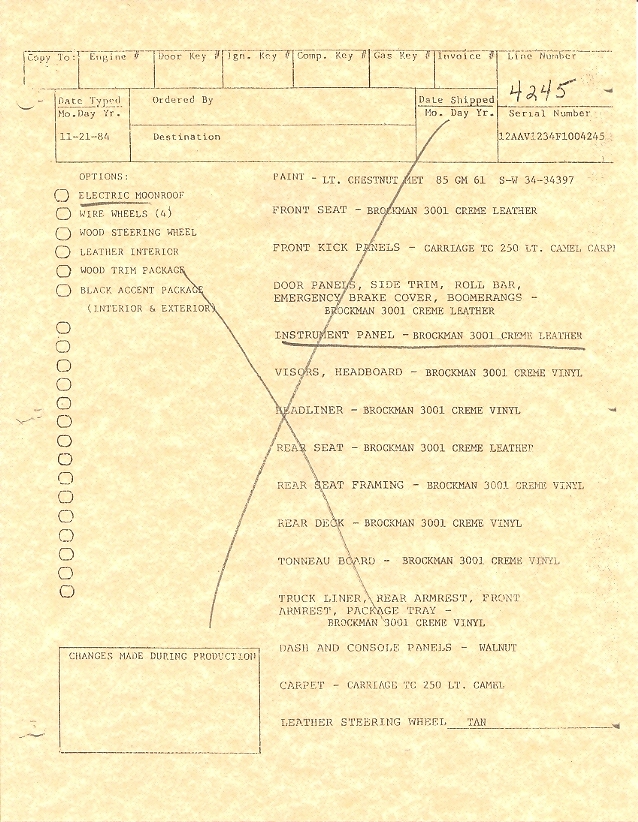
Well, this helps – a bit. This is the build sheet for 4238, the number I found on the back of several of my panels. It’s build specification seems to match my car in every respect.

  • Paint Silver Blue Metallic 85 AMC 4L S-W 34-33874 – seems to match the touchup offered in this link and offically called Adriatic Blue by AMC. From an 85 AMC Encore (the Renault version was called the Alliance) – the Avanti is probably the best car this paint ever touched!
  • All seat, door, headliner, visors, etc trim is Midnight Blue Leather/Vinyl
  • Kick Panels and Carpets are “Navy” blue
  • Steering Wheel is wood
  • Dash and console panels are “Elm”

Note that this build sheet doesn’t have any options check off on it, either. 4245 does have the electric moonroof, came with wire wheels in the trunk, wood steering wheel, leather interior and wood trim package.

The absence of other details, like key codes, engine #, ship date, etc are disappointing, but not so much that I wish I hadn’t bought these. Knowing the correct paint code was worth it to me – plus I have all the service history and purchase documents from the original owner.

Now, for me, the next I had was what happened to 4238 – was it even ever built? A quick look at Bob Johnstone’s excellent registry skips right over it, from 4237 to 4240. So I then ran an “Autocheck” on the VIN and found that the car apparently was built and DOES still exist.

So the car has been registered annually in Mount Vernon, Georgia since 2002. But 4238 has never been listed as a member of the Avanti Owners Association International (AOAI) nor do they have any current or former members in Mount Vernon, Georgia.

autocheck4238

So in that regard, I’m still at a bit of dead-end. Mt. Vernon is a small town of about 2500 people, so if someone in this town owns an Avanti, it’s likely that it is well-known. I guess at some point if I’m ever in the area, I’ll cruise around and see if I can find it.

And the other car whose numbers I found on mine, #4237? That car is listed in Bob Johnstone’s aforementioned registry as owned by an AOAI member in Derby, KS with no other details. Next I’ll try to contact them.